-name : Gabriel Dunne
+name : --
author: Gabriel Dunne
+author_initials: GLD
author_url : http://gabrieldunne.com
-author_email : gabe@gabrieldunne.com
+author_email : gldunne@gmail.com
markdown : redcarpet
pygments : true
permalink : /:title/
<body>
<div class="site">
- {{ content }}
+ {{ content }}
</div>
-
+
<div class="footer">
<p class="meta">
- © {{ site.time | date: "%Y" }} <a href="{{site.author_url}}">{{ site.author }}</a>
+ © {{ site.time | date: "%Y" }} <a href="mailto:{{site.author_email}}">{{ site.author_initials }}</a>
</p>
</div>
-
+
<script src="{{ site.baseurl }}/js/script.js"></script>
</body>
--- /dev/null
+---\r
+layout: post\r
+title: "older"\r
+date: 1999-01-01\r
+categories: projects\r
+---\r
+\r
+<a href="http://portfolio.quilime.com/2008/">2008</a> \r
+<a href="http://portfolio.quilime.com/new/port.php">2007</a> \r
+<a href="http://portfolio.quilime.com/recent.html">2005</a> \r
+<a href="http://portfolio.quilime.com/archive/">1999—2004</a>
\ No newline at end of file
--- /dev/null
+---\r
+layout: post\r
+title: "Troughs"\r
+date: 2001-07-05\r
+categories: projects\r
+---\r
+\r
+\r
+\r
+18" x 18" x 6" \r
+balsa wood\r
--- /dev/null
+---\r
+layout: post\r
+date: 2007-07-02\r
+title: Mask\r
+categories: projects\r
+---\r
+\r
+\r
+\r
+\r
+\r
+oil on panel \r
+12" x 12" \r
--- /dev/null
+---
+layout: post
+title: seashell
+date: 2009-01-06
+categories: projects
+---
+
+
+
+Conch Shell, wireless speaker removed and displayed for documentation
+
+Internal speaker hidden inside shell plays sounds of Los Angeles traffic, perceived as the sound of the ocean.
--- /dev/null
+---
+layout: post
+title: "Cymatic Organ"
+date: 2009-06-05
+categories: projects
+---
+
+
+
+Cymatic (Wave Form) Organ
+6 Channel Audio Installation
+speakers, water, arduino, processing, chuck, audio interface
+dimensions variable
+
+
+Speakers are suspended and filled with water. Speakers emit a frequency based on user-interaction that results in a visual and interactive display of vibrations. Each speaker is waterproofed, facing upward, and filled with water. Speakers are fitted with individual sensors, allowing viewers to interact with the emitted frequency as they would a Theramin. Multiple speakers are suspended at various heights throughout the space, operating as generative musical instruments. Synth and software created with Arduino, Processing and ChucK.
+
+Three distinct vibrations are present: light waves, sound waves, and the physical vibration of water.
+
+Each speaker vibrates with tones that vibrating the water visually in geometric cymatic patterns. The tones are synthesized in real time, and vary in pitch depending on user interaction.
+
+
+
+
+
+
+
+
+
+
+
+
+
+<iframe src="http://player.vimeo.com/video/68455215?byline=0&portrait=0&color=ffffff" width="600" height="337" frameborder="0" webkitAllowFullScreen mozallowfullscreen allowFullScreen></iframe>
+
+
+
+
+
+[Installation PDF](/content/projects/cymatic-organ/install/wave_form_organ_gdunne.pdf)
+
+<!--
+
+WAVE FORM ORGAN
+6 Channel Audio Installation
+20 ‘ x 15 ‘
+gdunne 2008
+WIRING / CIRCUIT
+laser
+laser
+photoresistor
+photoresistor
+amplifier
+fireface 400 (6 ch)
+CPU
+arduino
+water
+water
+speaker cone
+
+Three waveforms interact with eachother in this installation, generating music: light waves, sound waves, and
+the physical waves of water. Six speakers are suspended at various heights throughout the space, acting as
+a generative musical instrument. Each speaker is waterproofed, facing upward, and filled with water. A light is
+mounted on each speaker directed to reflect off the surface of the water, hitting a photoresistor, acting as a
+controller which triggers other speakers. As each speaker vibrates with tones that vibrating the water visually
+in geometric cymatic patterns. The sensors on each speaker trigger other speakers in the space,
+depending on amount of light reflected from the visual patterns in the water. The tones are synthesized in real
+time, and vary in pitch, length, and volume. The pitch of the tons are chosen to create the most distinct
+cymatic patterns, resulting in a visual and aural composition and experience.
+
+-->
\ No newline at end of file
--- /dev/null
+---\r
+layout: post\r
+title: "Audio-ShaderToy"\r
+date: 2012-04-03\r
+categories: code\r
+thumb: "/m/audioshadertoy/thumb.png"\r
+---\r
+\r
+\r
+\r
+\r
+Live-coding GLSL editor with audio spectrum data for creating audio-reactive shaders in WebGL, created by Ryan Alexander, Reza Ali, and Gabriel Dunne. Coded numbers in the shader become converted into performance sliders as they are typed, allowing any variable to be performed. Live audio data is made avaiable as a variable to affect visuals.\r
+\r
+Source on [Github](https://github.com/quilime/audio-shadertoy/).\r
+\r
+\r
+\r
+### exhibition\r
+<iframe src="http://player.vimeo.com/video/39874057?title=0&byline=0&portrait=0&color=ffffff" width="800" height="400" frameborder="0" webkitAllowFullScreen mozallowfullscreen allowFullScreen></iframe>\r
+Audio Shader-Toy at [Creators Project SF](http://thecreatorsproject.vice.com/zh-fr/videos/art-hack-weekend-san-francisco-2012)\r
+\r
+\r
+\r
+### performance\r
+\r
+<iframe src="http://player.vimeo.com/video/41406543?title=0&byline=0&portrait=0&color=ffffff" width="800" height="450" frameborder="0" webkitAllowFullScreen mozallowfullscreen allowFullScreen></iframe>\r
+Live-coded visuals by Gabriel Dunne for Chris Carlson .\r
--- /dev/null
+---\r
+layout: post\r
+title: "Vatica Dahlia"\r
+date: 2013-08-30\r
+categories: projects\r
+thumb: "/m/audioshadertoy/thumb.png"\r
+---\r
+\r
+\r
+\r
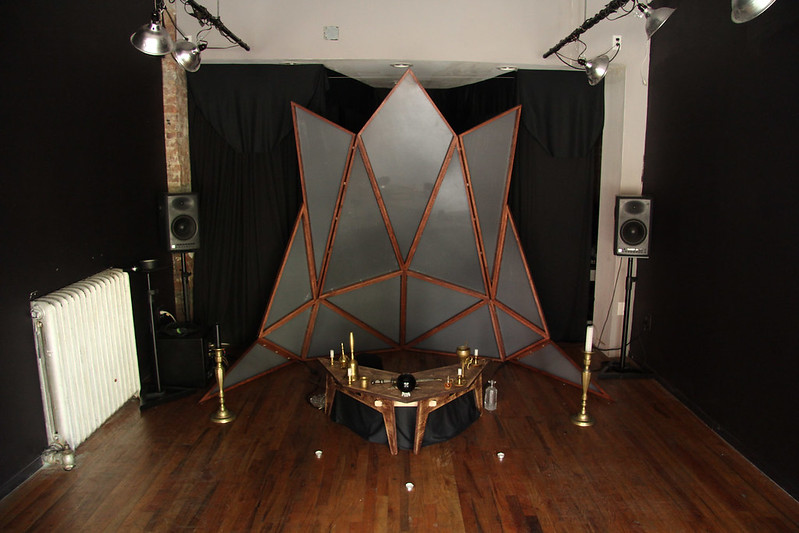
+live performance sculpture \r
+8' x 8' x 3' \r
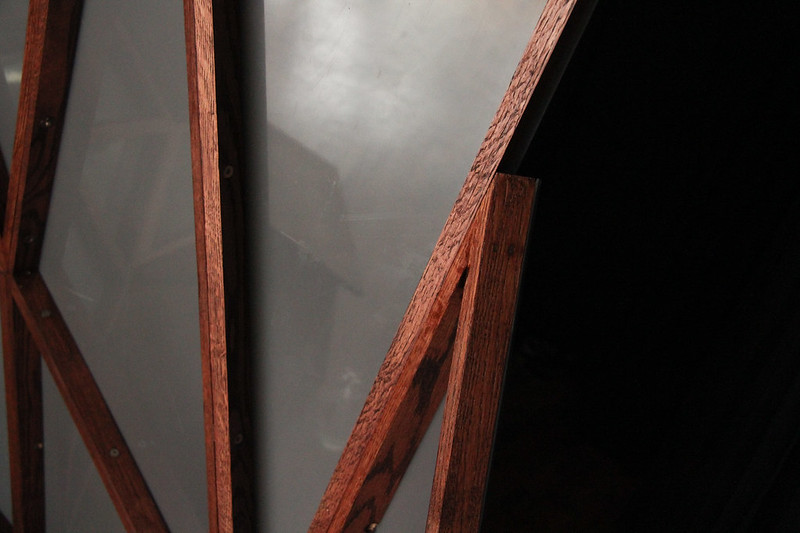
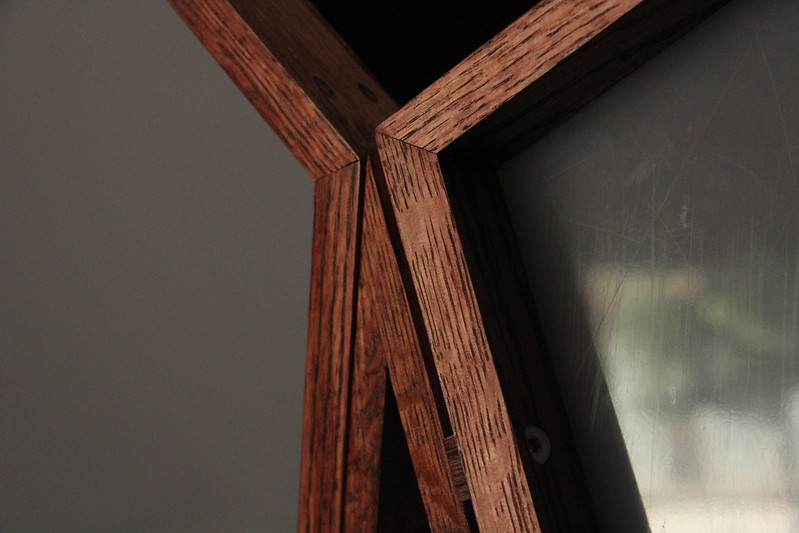
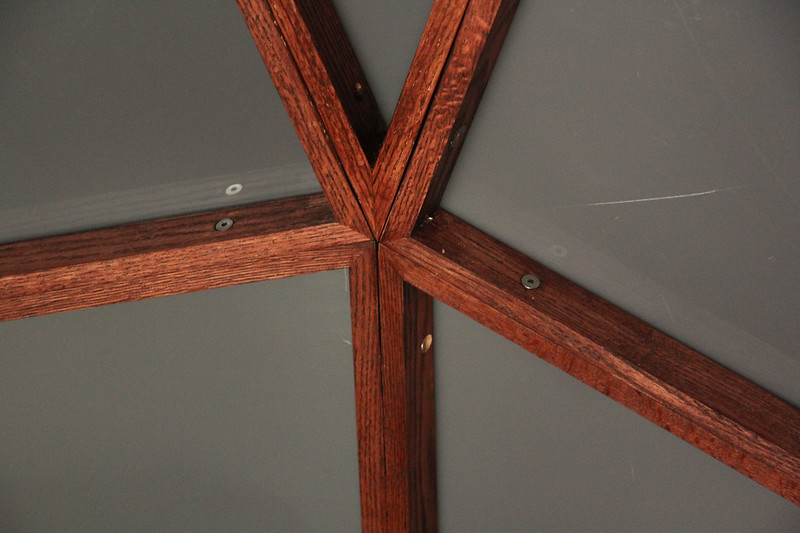
+red oak, polycarbonate plastic, GLSL, touchdesigner, rhino/grasshopper, projector\r
+\r
+> Much like creating a piece of software, a ritual is crafted procedurally and, when compiled correctly, there are results based upon what constituted the contents of the procedure. Vatica Dahlia’s Rites is a custom time-based system designed to port, compress, and obfuscate the Knowledge that has been handed down throughout the ages by the mages, sages, shamans, and initiates. Structured into distinct ten Chapters, each element utilizes a combination of networked performance, spatial sound, projection-mapped architecture, fashion, and ceremonial magic as a vehicle for transmutation and transmission.\r
+\r
+> -- [Vatica Dahlia](http://vaticadahlia.com)\r
+\r
+\r
+\r
+\r
+\r
+\r
+\r
+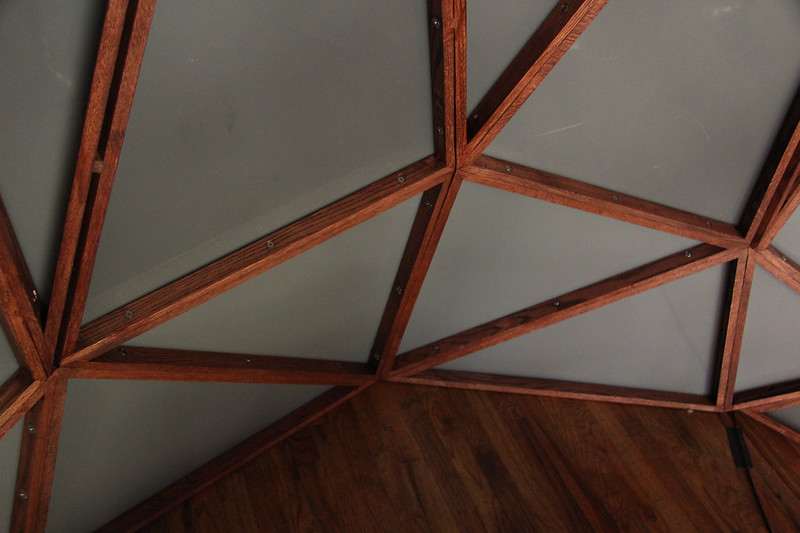\r
+\r
+more via [flickr](http://www.flickr.com/photos/quilime/sets/72157635109003752/)\r
+\r
+\r
+\r
+\r
+\r
+\r
+\r
+### exhibition\r
+\r
+2014 [San Francisco CA]() \r
+2013 [Brookly NY](http://areyoudevoted.squarespace.com/exhibitions/2013/8/28/vatica-dahlia-rites.html)\r
+\r
+\r
+\r
+\r
+\r
+Vatica Dahlia \r
+created by\r
+\r
+- <a href="http://pointlinesurface.com/">Cullen Miller</a>\r
+- <a href="http://gabrieldunne.com">Gabriel Dunne</a>\r
+- <a href="http://ssherriff.com">Stephanie Sherriff</a>\r
+- <a href="http://lara-grant.com/">Lara Grant</a>\r
+- <a href="http://onecm.com">Ryan Alexander</a>
\ No newline at end of file
layout: post
title: "Grasshopper -> TouchDesigner Bridge"
date: 2014-04-23
-categories: software
+categories: code
---
## Abstract
+++ /dev/null
----
-layout: post
-title: "Mitre Solutions for Fabricating Geometric Forms out of Wood"
-date: 2014-04-24
-categories: articles
-author: Gabriel Dunne
----
-
-## Truncated Tetrahedron Stool/Table
-
-I'm continuing my interations with the Tetrahedron model. I like using it for experiments because of it's a very basic "root" shape. This article will cover the creation of a truncated tetrahedron shape out of 3/4" material, with mitred joins.
-
-Software used in this tutorial:
- - Rhino
- - Grasshopper
-
-Tools:
- - Laser Cutter
- - Table Saw
-
-Materials
- - 1 sheet 4' x 8' x 1/2" birch sandply
-
-
-Step 1: Shape Design
-
-I am using Rhinoceros 3D for this tutorial. You can download a evaluation version for Windows or Mac here: http://www.rhino3d.com/download
-
-Start Rhino and create a new file with the template Small/Inches.
-
-[01-loading-rhino.png]
-
-There are a myriad of ways to create this type of geometric form, especially with software like Rhino, and its companion plugin, Grasshopper. For this tutorial, I'm going to go about it in a way that is based on transforms and booleans, so it should be portable in concept to other software.
-
-Tetrahedron From Scratch
-
-The first variable we use to define the shape is its edge length. Then, we figure out the height from that value with the height formula for a regular tetrahedron:
-
-[height formula]
-
-We can use a calculator to solve for h. I'm rounding to the hundreths for brevity, but you should use as many numbers past the decimal that your calculator or computer spits out
-
-2 / 3
-0.667
-squareroot
-0.816
-* 10 (edge length)
-8.164
-
-This shows that a tetrahedron with edge length 10 will have a height of 8.164.
-
-Oh, and if you want to shortcut the process of do this all from scratch, you can use the Pyramid tool, which is specific to Rhino, but other software will have this tool or something similar:
-
-[polygon video]
-
-Polygon Method
-
-Type "Polygon"
-
-
-
-
-
-
-Pyramid Method
-
-Type "Pyramid" into the command line.
-
-Options will appear in the command line. Set:
-NumSides=3 DirectionalConstraint=Vertical Solid=Yes
-
-Click Edge in the Pyramid command.
-
-Type "0" to set the origin
-
-Type "10" to set the edge length, and now the base of the pyramid will be constrained to 10 inch edges.
-
-Hold down shift to constrain the axis, and when you orient the tip of the base on the X axis, click once.
-
-[image of constrain]
-
-Type 8.16496580927726 into the command line. You can be as precise as you like, or just copy and paste from this tutorial. In the top view, orient the shape so it's right side up, and click once.
-
-Tetrahedron!
-
-
-
-
-
-## Truncation
-
-Now, we need to truncate our shape.
-
-Fist, we need to find the center of our shape. There are many ways to do this is various software, let's do it by hand.
-
-First I create a new layer and make it a color.
-
-I use the snapping tools to find the center of all the edges, and draw three lines that intersect at the center of all the faces. I do this for all 4 faces of the form.
-
-Then, I draw four lines that originate from the center of each face, and coincides with the far vertex opposite the face.
-
-The center of the form is where these four lines intersect. We can use the "Point" tool to create a point at the intersection.
-
-Type "Move" in the command line, and move our shape and the centerpoint we just created to the origin.
-
-Now we're centered.
-
-Select everything and group them with Command-G.
-
-Type "Rotate" into the command line.
-
-Type 0 to center at the origin, and set "Copy" to "Yes" in the command line options by clicking it.
-
-Hold down shift and click to set the second reference point on the vertical axis.
-
-With shift still held, rotate the form completely around so it's upside down, and press enter.
-
-Right Click to redo our same rotate command, but make sure Copy is set to Off.
-
-Type "0" to set the origin, hold down shift, and rotate the entire form 180 degrees from the top view.
-
-Now we have two intersecting tetrahedrons. If we were to do a boolean combine of these two objects, we would have an icosohedron.
-
-To create our truncation,we can scale one of the tetrahedrons to our liking, using the center point as the scale origin.
-
-When you get to a scale that you like, type Boolean2Objects, and click to cycle through the various boolean operations until you arrive at the truncated shape. You can keep trying different truncation scales until you find one you like.
-
-If you want t truncate the shape so it creates a perfect hexagon on three sides, enter "0" as the origin, and enter "1.666666666" as the scale factor.
-
-After you complete the Boolean2Objects command, your shape is complete.
-
-You can clean up and delete all the extra guide lines at this point.
-
-[blue truncated tet]
-
-Now, we need to scale the object to our build size.
-
-Stretch break.
-
-Ok, we're back.
-
-
-For my design, I'm going to ultimately use this as a table, so I'm going to cut off a bit from the bottom. This actually adds a little more work because I'll have to cut a few unique shapes in the plywood.
-
-I'm going to truncate at a 0.6666 of the length of the hexagon edges, because thirds are nice. I create a line along the edge of the lower hexagon sides, and then use the Divide tool with 3 segments.
-
-I then create a rectangle plane, and align it to the 2/3d's segement, and do another boolean.
-
-I chose 22" as the height of the finished object, which fits onto a single sheet of 4' x 8' ply.
-
-To make it easier to work with the form, I draw guidelines at the base and the top so I know where center is. These intersections are the reference point for moving and scaling the object.
-
-Move the object to the origin, and draw a 22" inch line from 0 on the Y axis. We'll use this line to scale to.
-
-Then, I make trace all the edges, do 3pt orients, and align them to the cutting plane.
-
-
-
-## Creating Thickness
-
-We need to:
-1. Offset mesh by .75
-2. Convert mesh to surfaces
-3. Dup border edge to find curves
-4. Loft inner curve to outer curve
-
-you only need to do this for each individual piece, and then duplicate them.
-
-
-
-## Measuring the Mitre Angles
-
-We need to draw some guidlines for measuring perpendicular to the edge of the face.
-
-[mitre angle edge measure]
-
-Then we measure the angle between the faces by typing "angle" in the command line, and selecting the beginning and ending of both lines. Then we find the mitre angle by dividing in half.
-
-For Support A, the hexagon-to-hexagon mating edge:
-70.529
-/ 2
-35.2645
-
-And for Support B, the hexagon-to-triangle edges:
-109.471
-/ 2
-54.7355
-
-We're going to use these angles to make some internal support triangle blocks.
-
-
-You can create thes any way you like. I navigate inside my object and just build them in relation to the form. I also add notches in the side of the triangle that won't be mated, so there's no puzzle-piece confusing when we assemble.
-
-We'll need to make 18 of each. Duplicate them so we have 18 each, and lay them out for our cut. You can be as precise as you like in laying out your cutfile. I typically try to be conservative with the material.
-
-[cutfile image]
-
-Now, we lasercut!
-
-
-[Metabeam Cutting Awesomeness]
-
-Now that the shapes are cut, we can mitre the edges.
-
-Using masking tape, I mark all the angles and lay them out.
-
-I'm using a 1HP Bosche Trim Router with a tilt add-on.
-
-This is an analog method of setting the angle, I typically error on the side of cutting more material away, because it's easier to fix a gap on the inside of the form, rather than the edges.
-
-[photos of setting the router angle]
-
-I cut all the edges one angle before setting the tool again.
-
-[cutting angles A]
-
-Now set the router to our additional angle
-
-[cutting angles B]
-
-We have one more special angle to cut, for the parts of the form that rest on the ground.
-
-[photo of cutting foot angle]
-
-We're done cutting!
-
-
-## Assembly
-
-We'll work upside down, and build the form up. Place the top of the form upside down on the worksurface
-
-[form upside down]
-
-And glue in supports. We can also screw or brad them in. I'm measuing out a fractional 1/3 position for the positions of my supports.
-
-[adding supports]
-
-Next, we add supports to the hexagonal sides, in order.
-
-[lay out supports on sides]
-
-Attach supports to hexagonal sides with glue and or brads
-
-[attaching supports]
-
-Arrange the sides and use a ratchet strap to hold them together while the glue sets
-
-[Setting sides]
-
-Attach sides to tabletop.
-
-[Attach hexagonal sides to eachother]
-
-The last part is the attach the triangles via glue and/or brads.
-
-[attaching triangles]
-
-Using an electric sander at first, buff the entire shape, and then lightly hit the corners by hand.
-
-[picture of finishing corners]
-
-Use your choice of finish to seal. I went with a combination beezwax oil.
-
-[finished glamour shots]
\ No newline at end of file
---
-
-I'm continuing interations with Tetrahedral geometry because of its simplistic beauty. This article will cover the creation of a truncated tetrahedron shape out of 3/4" material, with a solution for mitred joins between panels.
-
-
-
-## Requirements
-
### Software
- Rhino
- Grasshopper
- 4' x 8' x 3/4" birch sandply
-
## Design
I am using Rhinoceros 3D. There is an evaluation version for Windows or Mac available at [http://www.rhino3d.com/download](http://www.rhino3d.com/download).
Then, I use a calculator to solve for *h*. I'm rounding to the hundreths for brevity, but you should use as many numbers past the decimal that your calculator or computer spits out
-2 / 3
-**= 0.667**
-squareroot
-**= 0.816**
-* 10 (edge length)
-**= 8.164**
+2 / 3
+**= 0.667**
+squareroot
+**= 0.816**
+* 10 (edge length)
+**= 8.164**
Result: A tetrahedron with edge length 10 will have a height of 8.164.
Type `Pyramid` into the command line.
-Options will appear in the command line. By clicking on the variables, set the options to equal:
-
+Options will appear in the command line. By clicking on the variables, set the options to equal:
+
NumSides=3 DirectionalConstraint=Vertical Solid=Yes
Click Edge in the Pyramid command.
For Support A, the hexagon-to-hexagon mating edge:
-70.529 / 2
+70.529 / 2
**= 35.2645**
And for Support B, the hexagon-to-triangle edges:
-109.471 / 2
+109.471 / 2
**= 54.7355**
We're going to use these angles to make some internal support triangle blocks.
We're done cutting!
+## Assembly
+
+We'll work upside down, and build the form up. Place the top of the form upside down on the worksurface
+
+[form upside down]
+
+And glue in supports. We can also screw or brad them in. I'm measuing out a fractional 1/3 position for the positions of my supports.
+
+[adding supports]
+
+Next, we add supports to the hexagonal sides, in order.
+
+[lay out supports on sides]
+
+Attach supports to hexagonal sides with glue and or brads
+
+[attaching supports]
+
+Arrange the sides and use a ratchet strap to hold them together while the glue sets
+
+[Setting sides]
+
+Attach sides to tabletop.
+
+[Attach hexagonal sides to eachother]
+
+The last part is the attach the triangles via glue and/or brads.
+
+[attaching triangles]
+
+Using an electric sander at first, buff the entire shape, and then lightly hit the corners by hand.
+
+[picture of finishing corners]
+
+Use your choice of finish to seal. I went with a combination beezwax oil.
+
+[finished glamour shots]
+
+
+
+
+
+
+
+
+
+
+
+
+
+
+
+
+
+
+
+
+
+
+
+
+
+
+
+
+
+
+
+
+
+
+
+
+
+
+
+
+
+
+
+
+
+
+
+
+
+
+
+
+
+
+## Truncated Tetrahedron Stool/Table
+
+I'm continuing my interations with the Tetrahedron model. I like using it for experiments because of it's a very basic "root" shape. This article will cover the creation of a truncated tetrahedron shape out of 3/4" material, with mitred joins.
+
+Software used in this tutorial:
+ - Rhino
+ - Grasshopper
+
+Tools:
+ - Laser Cutter
+ - Table Saw
+
+Materials
+ - 1 sheet 4' x 8' x 1/2" birch sandply
+
+
+Step 1: Shape Design
+
+I am using Rhinoceros 3D for this tutorial. You can download a evaluation version for Windows or Mac here: http://www.rhino3d.com/download
+
+Start Rhino and create a new file with the template Small/Inches.
+
+[01-loading-rhino.png]
+
+There are a myriad of ways to create this type of geometric form, especially with software like Rhino, and its companion plugin, Grasshopper. For this tutorial, I'm going to go about it in a way that is based on transforms and booleans, so it should be portable in concept to other software.
+
+Tetrahedron From Scratch
+
+The first variable we use to define the shape is its edge length. Then, we figure out the height from that value with the height formula for a regular tetrahedron:
+
+[height formula]
+
+We can use a calculator to solve for h. I'm rounding to the hundreths for brevity, but you should use as many numbers past the decimal that your calculator or computer spits out
+
+2 / 3
+0.667
+squareroot
+0.816
+* 10 (edge length)
+8.164
+
+This shows that a tetrahedron with edge length 10 will have a height of 8.164.
+
+Oh, and if you want to shortcut the process of do this all from scratch, you can use the Pyramid tool, which is specific to Rhino, but other software will have this tool or something similar:
+
+[polygon video]
+
+Polygon Method
+
+Type "Polygon"
+
+
+
+
+
+
+Pyramid Method
+
+Type "Pyramid" into the command line.
+
+Options will appear in the command line. Set:
+NumSides=3 DirectionalConstraint=Vertical Solid=Yes
+
+Click Edge in the Pyramid command.
+
+Type "0" to set the origin
+
+Type "10" to set the edge length, and now the base of the pyramid will be constrained to 10 inch edges.
+
+Hold down shift to constrain the axis, and when you orient the tip of the base on the X axis, click once.
+
+[image of constrain]
+
+Type 8.16496580927726 into the command line. You can be as precise as you like, or just copy and paste from this tutorial. In the top view, orient the shape so it's right side up, and click once.
+
+Tetrahedron!
+
+
+
+
+
+## Truncation
+
+Now, we need to truncate our shape.
+
+Fist, we need to find the center of our shape. There are many ways to do this is various software, let's do it by hand.
+
+First I create a new layer and make it a color.
+
+I use the snapping tools to find the center of all the edges, and draw three lines that intersect at the center of all the faces. I do this for all 4 faces of the form.
+
+Then, I draw four lines that originate from the center of each face, and coincides with the far vertex opposite the face.
+
+The center of the form is where these four lines intersect. We can use the "Point" tool to create a point at the intersection.
+
+Type "Move" in the command line, and move our shape and the centerpoint we just created to the origin.
+
+Now we're centered.
+
+Select everything and group them with Command-G.
+
+Type "Rotate" into the command line.
+
+Type 0 to center at the origin, and set "Copy" to "Yes" in the command line options by clicking it.
+
+Hold down shift and click to set the second reference point on the vertical axis.
+
+With shift still held, rotate the form completely around so it's upside down, and press enter.
+
+Right Click to redo our same rotate command, but make sure Copy is set to Off.
+
+Type "0" to set the origin, hold down shift, and rotate the entire form 180 degrees from the top view.
+
+Now we have two intersecting tetrahedrons. If we were to do a boolean combine of these two objects, we would have an icosohedron.
+
+To create our truncation,we can scale one of the tetrahedrons to our liking, using the center point as the scale origin.
+
+When you get to a scale that you like, type Boolean2Objects, and click to cycle through the various boolean operations until you arrive at the truncated shape. You can keep trying different truncation scales until you find one you like.
+
+If you want t truncate the shape so it creates a perfect hexagon on three sides, enter "0" as the origin, and enter "1.666666666" as the scale factor.
+
+After you complete the Boolean2Objects command, your shape is complete.
+
+You can clean up and delete all the extra guide lines at this point.
+
+[blue truncated tet]
+
+Now, we need to scale the object to our build size.
+
+Stretch break.
+
+Ok, we're back.
+
+
+For my design, I'm going to ultimately use this as a table, so I'm going to cut off a bit from the bottom. This actually adds a little more work because I'll have to cut a few unique shapes in the plywood.
+
+I'm going to truncate at a 0.6666 of the length of the hexagon edges, because thirds are nice. I create a line along the edge of the lower hexagon sides, and then use the Divide tool with 3 segments.
+
+I then create a rectangle plane, and align it to the 2/3d's segement, and do another boolean.
+
+I chose 22" as the height of the finished object, which fits onto a single sheet of 4' x 8' ply.
+
+To make it easier to work with the form, I draw guidelines at the base and the top so I know where center is. These intersections are the reference point for moving and scaling the object.
+
+Move the object to the origin, and draw a 22" inch line from 0 on the Y axis. We'll use this line to scale to.
+
+Then, I make trace all the edges, do 3pt orients, and align them to the cutting plane.
+
+
+
+## Creating Thickness
+
+We need to:
+1. Offset mesh by .75
+2. Convert mesh to surfaces
+3. Dup border edge to find curves
+4. Loft inner curve to outer curve
+
+you only need to do this for each individual piece, and then duplicate them.
+
+
+
+## Measuring the Mitre Angles
+
+We need to draw some guidlines for measuring perpendicular to the edge of the face.
+
+[mitre angle edge measure]
+
+Then we measure the angle between the faces by typing "angle" in the command line, and selecting the beginning and ending of both lines. Then we find the mitre angle by dividing in half.
+
+For Support A, the hexagon-to-hexagon mating edge:
+70.529
+/ 2
+35.2645
+
+And for Support B, the hexagon-to-triangle edges:
+109.471
+/ 2
+54.7355
+
+We're going to use these angles to make some internal support triangle blocks.
+
+
+You can create thes any way you like. I navigate inside my object and just build them in relation to the form. I also add notches in the side of the triangle that won't be mated, so there's no puzzle-piece confusing when we assemble.
+
+We'll need to make 18 of each. Duplicate them so we have 18 each, and lay them out for our cut. You can be as precise as you like in laying out your cutfile. I typically try to be conservative with the material.
+
+[cutfile image]
+
+Now, we lasercut!
+
+
+[Metabeam Cutting Awesomeness]
+
+Now that the shapes are cut, we can mitre the edges.
+
+Using masking tape, I mark all the angles and lay them out.
+
+I'm using a 1HP Bosche Trim Router with a tilt add-on.
+
+This is an analog method of setting the angle, I typically error on the side of cutting more material away, because it's easier to fix a gap on the inside of the form, rather than the edges.
+
+[photos of setting the router angle]
+
+I cut all the edges one angle before setting the tool again.
+
+[cutting angles A]
+
+Now set the router to our additional angle
+
+[cutting angles B]
+
+We have one more special angle to cut, for the parts of the form that rest on the ground.
+
+[photo of cutting foot angle]
+
+We're done cutting!
+
+
## Assembly
We'll work upside down, and build the form up. Place the top of the form upside down on the worksurface
/*-moz-animation: fadein 1s;*/
/* Safari and Chrome */
/*-webkit-animation: fadein 1s;*/
- /* Opera */
+ /* Opera */
/*-o-animation: fadein 1s;*/
}
}*/
h1,h2,h3, h4, h5, h6 {
+
font-size: 1em;
color:#000;
line-height:1.5em;
font-weight:bold;
margin: 1em 0;
}
-h1 {
- margin:1em 0;
+h1 {
+
+ margin:1em 0;
font-size:2.8em;
padding-bottom:0.25em;
text-align:center;
font-family:lettergothic;
border-bottom:1px solid #aaa;
}
-h2, h3 {
+h2, h3 {
text-align:center;
- margin:3em 0 2em 0;
+ margin:3em 0 2em 0;
font-size:1em;
-
+
}
h3 {
text-align:left;
a:hover { color: #000; }
a:visited { color: #a0a; }
-blockquote { padding:1em; font-style:italic; }
+blockquote {
+ padding:2em;
+ line-height:2em;
+
+ }
p { text-align:left; }
.footer {
text-align:center;
color: #999;
- margin: 2em 0;
+ margin: 6em 0 2em 0;
}
.nav {
---
{% for category in site.categories %}
-<h3>{{ category | first }}</h3>
+<h3>{{ category | first }}</h3>
<ul class="posts">
{% for posts in category %}
{% for post in posts %}
{% if post.url %}
- <li><a href="{{ site.baseurl }}{{ post.url }}">{{ post.title }}</a></li>
+ <li>
+ <!-- <img src="{{ site.baseurl }}{{ post.thumb }}" /> -->
+ <a href="{{ site.baseurl }}{{ post.url }}">{{ post.title }}</a>
+ </li>
{% endif %}
{% endfor %}
{% endfor %}
- </ul>
+ </ul>
{% endfor %}