-name : notes
+name : process notes
markdown : redcarpet
pygments : true
permalink : /:month-:day-:year/:title.html
-baseurl : /notes
\ No newline at end of file
+baseurl : /process
+exclude: [ publish.sh ]
\ No newline at end of file
---
layout: post
title: "First Post"
-date: 2014-04-23 21:54:59
+date: 2014-04-21 21:54:59
categories: projects
+author : Gabriel Dunne
---
Putting my ancient home-brewed [blog software](http://git.quilime.com/?p=plog.git) on a break and giving [Jekyll](https://github.com/mojombo/jekyll) a try.
title: "Grasshopper -> TouchDesigner Bridge"
date: 2014-04-23
categories: articles
+author : Gabriel Dunne
---
by Gabriel Dunne
--- /dev/null
+---
+layout: post
+title: "Projection Mapping Generative Forms with Grasshopper and TouchDesigner"
+date: 2014-04-24
+categories: articles
+author: Gabriel Dunne
+---
+
+
+
+This article is a documentation of a process for making generative geometric forms for use in projection mapping.
+
+# Requirements
+
+## Software
+- [Rhino3D](http://rhino3d.com)
+- [Grasshopper3D](http://www.grasshopper3d.com/)
+ - [gHowl](http://www.grasshopper3d.com/group/ghowl)
+ - [GhPython](http://www.food4rhino.com/project/ghpython)
+- [TouchDesigner](https://www.derivative.ca/)
+
+## Hardware
+- Digital Projector
+- Windows PC with TouchDesigner supported videocard.
+
+## Fabrication Tools
+- Laser Cutter
+
+## Materials
+- 10mm Plywood Stock
+- Cyanoacrylate Super Glue
+- Neodynimum Magnets
+- Angle Brackets
+- Gap-filling paint/primer
+
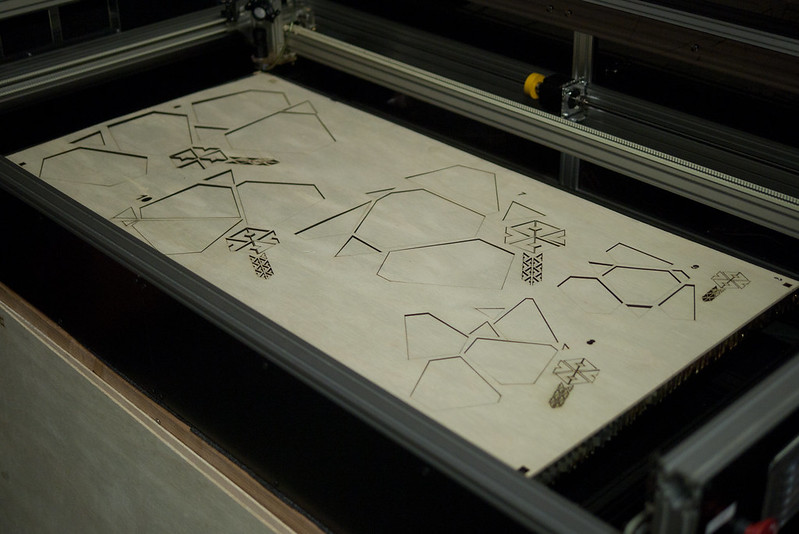
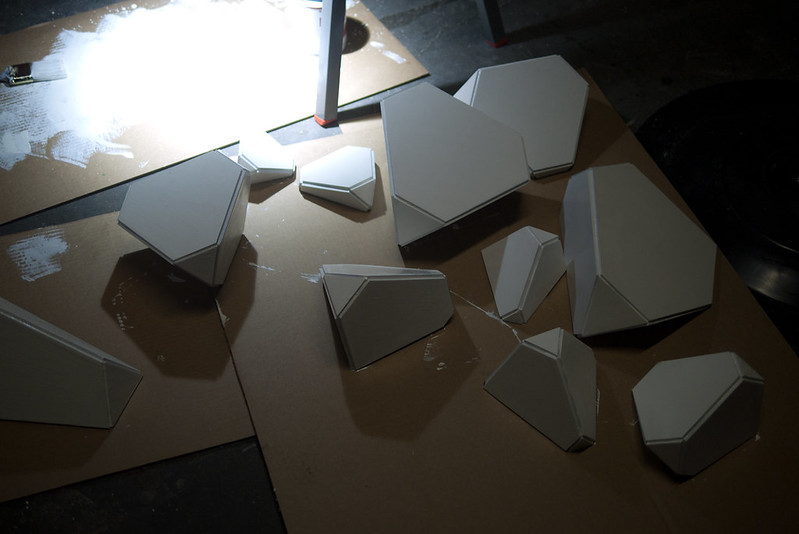
+I arrived at this design during an experiment on rapid fabrication closely linked with the process of projection-mapping. It consists of a series of projection-mapped truncated tetrahedrons made out of 10mm plywood. They vary in size, orientation, and all have an arbirary boolean intersection with a vertical plane, allowing them all have unique placements on the wall. Rhino/Grasshopper was used to generate the geometry, and TouchDesigner was used for the projection graphics. The polygon mesh information used for projections are received by TouchDesigner from Grasshopper via my [Grasshopper -> TouchDesigner Bridge]({% post_url 2014-04-23-gh-td %}).
+
+This iteration does not include a solution mitered corners, due to the physical tendancies of the laser cutter, which simplifies the fabrication process considerably. My current process is designing a precise, repeatable solution for generating mitres when fabricating polygonal shapes.
+
+# Design
+
+The geometry was created in Grasshopper.
+
+[grasshopper patch/screenshot]
+
+Grasshopper process.
+
+# Fabrication Process
+
+
+
+Forms were cut with a LaserSaur laser cutter from sheets of lightweight, low-grade 10mm ply.
+
+
+
+Panels are superglued together by hand. The interior support structure relies on two angle wedges, which are superglued to the interior of the forms.
+
+
+
+After the glue dries (very I gave them multiple coats of white primer and gap filler.
+
+# Installation
+
+Ultra strong neodynium magnets were used as a mounting solution. I tried the methods of inserting large-headed nails or screws into the wall, or simply gaff-taping an opposing magnet. The gaff-tape method was a temporary, but works.
+
+[magnet shot]
+
+# Projection Mapping
+
+[touch designer graphics page/screenshot]
+
+
---
layout: post
-title: "Geometric Forms out of Wood"
+title: "Creating Arbitrary Mitre Angles in Wood Panels"
date: 2014-04-24
categories: articles
+author: Gabriel Dunne
---
-# Introduction
-
-This article is an depth documentation of my process for making geometric forms out of wood, and a method for cutting custom mitres.
-
-
-Here is a series of truncated tetrahedrons, cut from 10mm ply on a laser cutter.
-
-
-
-Using Grasshopper, I created a series of shapes that intersect with a plane. They all vary in size, orientation, and where the plane intersects. Later, I projection mapped graphics onto them.
-
-
-[ finished tets on wall ]
-
-All parts were cut from lightweight 10mm ply. The interior support structure relies on two angle wedges, which are superglued to the interior of the forms.
-
-[ making-of photo ]
-
-This design doesn't include a solution mitered edges due to the nature of the laser cutter. My current process is coming up with a precise, repeatable way to generate mitres for polygonal shapes.
-
-
-
# Truncated Tetrahedron Stool/Table
-I'm going to continue to iterate with a Tetrahedron model, as it's a very basic "root" shape. This process will cover the creation of a truncated tetrahedron shape prototype out of 3/4" material.
+I'm continuing my interations with the Tetrahedron model. I like using it for experiments because of it's a very basic "root" shape. This article will cover the creation of a truncated tetrahedron shape out of 3/4" material, with mitred joins.
Software used in this tutorial:
- Rhino
Use your choice of finish to seal. I went with a combination beezwax oil.
-[finished glamour shots]
-
+[finished glamour shots]
\ No newline at end of file
font-size: 1em;
}
-h1 { margin-bottom: 1em; }
+h1 { margin: 2em 0; }
+h2 { margin-top:1em; }
p { margin: 1em 0; }
a { color: #00a; }
/*****************************************************************************/
.site {
- margin: 2em;
+ margin: 2em 8em 2em 2em;
+ max-width:800px;
line-height: 1.5em;
}
#!/bin/bash
jekyll build
-rsync _site quilime@quilime.com:/home/quilime/gabrieldunne-site/notes --delete
+rsync -avz _site/ quilime@quilime.com:/home/quilime/gabrieldunne-site/process/ --delete